Have you ever wondered whether it actually matters which arm you use when you check your blood pressure? It does — more than most people realize. Which arm to measure blood pressure is one of those small details that can meaningfully affect your readings, and getting it right is easier than you think. If you're a photographer or creative professional spending long hours on your feet or hunched over editing screens, monitoring your blood pressure at home is a smart habit worth building. This guide covers everything you need: arm selection, measurement technique, equipment, and long-term tracking. For more wellness and gear guidance, browse our photography articles.

Blood pressure monitoring has never been more accessible. Affordable digital cuffs, app-connected devices, and wrist monitors line pharmacy shelves and online marketplaces. But convenience doesn't guarantee accuracy. The arm you choose, the cuff you use, and the habits you build around measurement all shape whether your readings actually mean anything.
The good news is that once you understand the basics, getting reliable numbers is straightforward. Most clinical guidelines converge on a clear recommendation, and following it takes less than five minutes out of your day.
Contents
Blood pressure is the force your blood exerts against artery walls as your heart pumps. When you take a reading, you're measuring two values: systolic pressure (the peak force during a heartbeat) and diastolic pressure (the resting pressure between beats). Both values depend on blood flow, and blood flow can differ slightly between your left and right arms.
The reason is anatomy. Your aorta — the main artery leaving the heart — branches differently on each side. The right subclavian artery, which supplies the right arm, branches off the brachiocephalic trunk. The left subclavian artery branches directly from the aorta. This structural difference means small but measurable pressure differences between arms are completely normal and don't signal anything dangerous on their own.
You might assume your dominant arm — the one you use more — would show higher readings because the muscles are more developed. Research doesn't consistently support that assumption. The differences between arms have more to do with arterial anatomy and any underlying circulatory conditions than with muscle use. That said, if there's a significant difference — generally defined as more than 10 mmHg between arms — your doctor will want to investigate further.
For most people, the difference is minor and clinically insignificant. The goal is to pick one arm, verify it against a clinical reading, and use it consistently every time you measure.
According to the American Heart Association, blood pressure should initially be measured in both arms. Once a difference is established, you should consistently use the arm that showed the higher reading. The higher number is the more clinically relevant one — it reflects the maximum load on your cardiovascular system.
In practice, many clinicians default to the left arm for initial readings, largely because of historical convention and the left arm's closer arterial proximity to the heart. But the arm with the higher reading is the one you should use for all ongoing home monitoring. If both arms are within 5 mmHg of each other, either arm is acceptable — just pick one and stick with it.
Your doctor may ask you to measure blood pressure in both arms if you have a history of cardiovascular disease, peripheral artery disease, or certain structural heart conditions. A persistent difference of 10 mmHg or more between arms is associated with increased risk of arterial stiffness and stroke. In these cases, monitoring both arms provides a fuller picture of your vascular health over time.
If you're starting home monitoring for the first time, take readings in both arms for the first week. Record both numbers each session. Then bring that data to your next appointment so your doctor can confirm which arm to prioritize going forward.
Preparation matters as much as technique. Your blood pressure fluctuates constantly — exercise, stress, caffeine, and even a full bladder can push it higher temporarily. To get a baseline reading you can actually rely on, take these steps before you even put on the cuff:
Just as attention to detail separates a sharp, well-exposed image from a throwaway shot — a principle that runs through everything in our digital photography tips for beginners — precise preparation separates a meaningful blood pressure reading from noise you can't use.
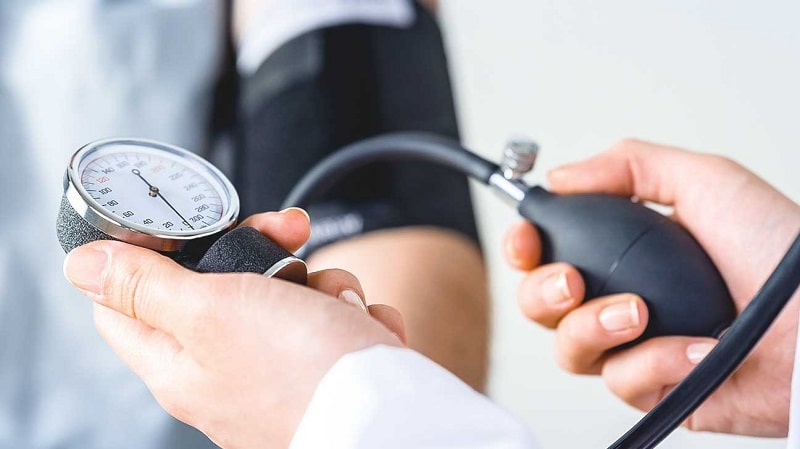
Place the cuff on your bare upper arm, not over clothing. The bottom edge of the cuff should sit about one inch above the bend of your elbow. Your arm must rest at heart level — if you're measuring the left arm, rest it on a table so the cuff sits at the same height as your chest. Support the arm fully; holding it suspended in the air engages muscles and elevates readings artificially.
Press start and stay completely still. Don't talk, check your phone, or shift position while the device is measuring. After the reading, wait one to two minutes and take a second measurement. Use the average of both readings as your official number for that session.

Not all monitors are created equal. Upper arm cuffs are the gold standard for home monitoring — they're validated against clinical devices and produce the most consistent results. Wrist monitors are portable and convenient, but they're more sensitive to arm position, which makes them prone to error if you're not careful about positioning. Finger monitors are not recommended for regular monitoring at all.
Look for a device that is clinically validated by a recognized organization such as the American Medical Association or the British and Irish Hypertension Society. Most well-reviewed upper arm monitors include memory storage, irregular heartbeat detection, and optional app connectivity — all useful features for building a meaningful long-term log.
| Monitor Type | Typical Price Range | Accuracy | Best For |
|---|---|---|---|
| Upper Arm (basic) | $25–$50 | High | Daily home monitoring |
| Upper Arm (advanced) | $50–$100 | High | App sync, memory storage, arrhythmia detection |
| Wrist Monitor | $30–$80 | Moderate | Travel and portability |
| Finger Monitor | $20–$50 | Low | Not recommended for regular use |
| Smart Wearable (BP-enabled) | $150–$400 | Varies by device | Continuous trend monitoring |
A basic validated upper arm monitor is all most people need to start. Spending more gets you convenience features, but entry-level accuracy from major brands is already solid. Just as you don't need the most expensive camera body to capture a great portrait — you need the right tool used correctly — the same logic applies here. If you're evaluating whether to upgrade or trade in older gear, our guide on where to sell used camera equipment walks through how to assess real-world value before you buy.
Consistency is the whole game in home blood pressure monitoring. A single reading tells you almost nothing in isolation. A month of daily readings taken at the same time each day tells you a great deal. Most guidelines recommend measuring once in the morning before medication and food, and once in the evening, for at least seven consecutive days before any doctor's appointment.
Pick a time slot that fits naturally into your existing routine. Many people find that linking their blood pressure check to another fixed habit — brewing morning coffee, brushing teeth at night — makes it effortless to sustain. The goal is a log of readings, not a single snapshot. Your doctor needs a pattern, not a data point.
Write down every reading. Include the date, time, which arm you used, and any relevant context — post-exercise, high-stress day, after a large meal. Most digital monitors store readings internally, but a written or spreadsheet log is easier to share with your doctor and easier to scan for patterns yourself.
Several free apps — including those from major monitor manufacturers — will generate trend graphs and calculate averages automatically. If your monitor connects to your phone, use that feature. Visualizing your data over weeks reveals what individual readings hide: a slow upward trend, morning spikes, or consistently elevated evening numbers that warrant a conversation with your doctor.
The most common mistake is measuring right after activity. Even a short walk to the bathroom raises blood pressure noticeably. Sit for five minutes before every reading — no exceptions. The second most common mistake is cuff sizing. A cuff that's too small produces falsely high readings; one that's too large reads falsely low. Most monitors include an arm circumference guide printed directly on the cuff.
Talking during a measurement elevates systolic pressure by several points. And measuring over a thick sleeve? That can inflate readings by anywhere from 5 to 50 mmHg depending on the fabric. Always measure on bare skin, on the same arm, at the same time of day. Remove those variables and your data becomes genuinely useful.
Bring your home monitor to your doctor's office at least once a year. Ask the nurse to take a simultaneous reading using both your device and their office equipment. This cross-check — sometimes called monitor validation — confirms whether your device is reading accurately. If there's a consistent gap between the two readings, you'll know exactly how to adjust your interpretation of your home numbers.
Any reading above 180/120 mmHg is a hypertensive crisis and requires immediate medical attention. Don't wait to see if it normalizes. Call emergency services or go directly to an emergency room. On the other end, consistently low readings below 90/60 mmHg combined with symptoms like dizziness, fainting, or confusion also warrant an urgent call to your doctor.
Neither arm is universally more accurate. Clinical guidelines recommend measuring in both arms initially, then consistently using the arm that shows the higher reading. For most people, the difference between arms is small, but the higher-reading arm reflects the maximum cardiovascular load and is the more medically relevant number to track over time.
Yes, it matters significantly. Switching arms introduces variability that makes it impossible to compare readings meaningfully across sessions. Once you've identified your measurement arm, use only that arm for all home monitoring. Consistency is the entire foundation of useful blood pressure data.
Small differences are normal due to the anatomy of your arterial system — the arteries supplying each arm branch from the aorta in different ways, producing slightly different pressures. A difference of up to 10 mmHg is generally considered normal. A persistent difference greater than 10 mmHg may indicate peripheral artery disease or other circulatory issues and is worth discussing with your doctor.
You can, but upper arm cuffs remain the clinical gold standard and produce more reliable results. Wrist monitors are highly sensitive to arm position — if your wrist isn't held precisely at heart level during measurement, the reading can be significantly off. If portability matters to you, use a wrist monitor carefully and periodically cross-check it against an upper arm device to verify accuracy.
Most guidelines recommend twice daily — once in the morning before medication and food, and once in the evening — for at least seven consecutive days before any medical appointment. Outside of doctor-appointment preparation, once daily is sufficient for most people managing a stable condition. Your doctor may advise a different frequency based on your personal health situation.


About Editorial Team
The DigiLabsPro editorial team covers cameras, lenses, photography gear, and creative technology with a focus on helping photographers make informed buying decisions. Our reviews and guides draw on hands-on testing and research across a wide range of equipment, from entry-level beginner kits to professional-grade systems.
You can get FREE Gifts. Or latest Free phones here.
Disable Ad block to reveal all the info. Once done, hit a button below
