The Plustek OpticFilm 135i Ai takes our top spot for 2026 thanks to its third-generation lens system and bundled SilverFast Ai Studio 9 software — it's the closest you'll get to drum-scan quality at home. But the best negative scanner for you depends on whether you need professional-grade resolution or just a quick way to digitize old family photos.
Negative scanners (also called film scanners) convert your 35mm film strips, slides, and other analog formats into digital files you can edit, share, and store. The technology has come a long way — modern dedicated film scanners offer resolutions up to 10,000 dpi (dots per inch, a measure of how much detail the scanner captures), infrared dust removal, and software that can automatically correct color fading. Whether you're a professional photographer archiving decades of work or someone who just found a box of old negatives in the attic, there's a scanner that fits your needs and budget.
We tested and researched seven of the most popular negative scanners available in 2026, ranging from professional dedicated units to beginner-friendly standalone converters. Our picks cover everything from high-end film scanning for archival work to affordable options that get the job done without a steep learning curve. If you're also looking to digitize documents or photos, check out our guide to the best portable scanners for Mac for more versatile options.

Contents







If you want the sharpest scans money can buy without stepping into the world of $3,000+ drum scanners, the Plustek OpticFilm 135i Ai is the scanner to beat in 2026. This is Plustek's latest flagship, launched in 2025 with a completely redesigned third-generation 5-element lens system. That new lens matters — it reduces light refraction at the edges of the frame, which means your corners are nearly as sharp as the center. For anyone who shoots wide-angle lenses on film, that's a real upgrade over older Plustek models.
The bundled software package is a major selling point. You get SilverFast Ai Studio 9, which is the top-tier version of what many consider the best scanning software available, plus an Advanced IT8 Calibration Target (3 slides) for dialing in color accuracy. The infrared dust and scratch removal (iSRD) has also been improved — Plustek claims a 200% boost in MTF (modulation transfer function, essentially a measure of how well the scanner resolves fine detail in infrared mode). In practice, this means the dust removal works more aggressively without softening your actual image detail.
The downside? Speed. Like all dedicated film scanners at this quality level, you're looking at several minutes per frame at maximum resolution with multi-pass scanning enabled. And the price puts it firmly in the enthusiast-to-professional category. But if scan quality is your top priority, this is where your money should go.
Pros:
Cons:
The Plustek OpticFilm 8200i SE has been a staple in the film scanning world for years, and for good reason — it delivers 7200 dpi optical resolution at a price that won't require a second mortgage. At 7200 x 7200 dpi, you're getting scans that resolve up to 69 megapixels from a single 35mm frame. That's more than enough detail for large prints or heavy cropping.
The built-in infrared channel is the feature that separates this from cheaper alternatives. It detects dust and scratches on the surface of your negatives and slides, then the bundled SilverFast SE Plus 9 software removes them automatically. This saves you hours of manual retouching in Photoshop. The Multi-Exposure function captures multiple passes at different exposure levels and combines them, which pulls more detail out of dense shadow areas — giving you an effective dynamic range of up to 3.6 Dmax.
Where the 8200i SE shows its age compared to the 135i Ai is in the lens system and scanning speed. It uses the previous-generation optics, so edge sharpness isn't quite as crisp. The software bundle is also the SE Plus tier rather than the full Ai Studio. But honestly, for most hobbyists and even semi-pro photographers, the difference in scan quality between this and the 135i Ai is noticeable mainly in side-by-side pixel-peeping comparisons. For the price difference, this is the smarter buy for most people.
Pros:
Cons:
The Pacific Image PrimeFilm XE Plus is the resolution king of this roundup, offering a staggering 10,000 dpi optical resolution. That's significantly higher than either Plustek model on paper, and it's backed by a genuine RGB linear array CCD sensor — the same type of sensor technology used in professional-grade scanners. With a 3.9 dynamic range, it also captures more tonal information in shadows and highlights than the Plustek 8200i SE.
Pacific Image has packed in a solid set of automatic correction features. Auto Exposure, Auto Contrast, and Auto Color handle the basics, while Magic Touch provides infrared-based dust and scratch removal similar to what you get from the Plustek models. The multi-pass exposure and DNR (digital noise reduction) features help you squeeze every bit of detail from tricky negatives. The film holders are well-designed with pressure strips that keep film flat during scanning — film curl is a real problem with older negatives, and this helps a lot.
The trade-off is that this is a manual-feed scanner. You insert the film holder by hand for each frame or strip, which makes batch scanning a tedious process. If you have hundreds of frames to scan, you'll want to look at the XA Plus below instead. The software interface is also not as polished as SilverFast, though it gets the job done. For photographers who prioritize raw resolution and don't mind a slower workflow, the XE Plus delivers excellent bang for the buck.
Pros:
Cons:
Got a shoebox full of uncut film rolls? The Pacific Image PrimeFilm XA Plus is the scanner you need. Its standout feature is automatic film feeding — you continuously insert film strips and rolls, and it advances them through the scanner on its own. It handles up to 40 frames in a single batch, which is a massive time saver compared to manually loading individual strips.
The XA Plus matches its sibling's 10,000 dpi resolution and pairs it with an even wider 4.2 dynamic range — the highest in this roundup. That extra dynamic range means it captures more detail in the darkest shadows and brightest highlights of your negatives. The built-in auto-focus is another convenience feature that the manual XE Plus lacks. Instead of relying on a fixed focus point, the XA Plus automatically adjusts for optimal clarity on each frame. Pacific Image says this also delivers higher color saturation for more natural-looking images.
The automatic feeding mechanism does add a premium to the price, and there's a small risk of scratching with heavily curled or damaged film strips. If your negatives are in good condition, though, the auto-feed works reliably and dramatically speeds up the scanning process. For anyone with a large archive of film to digitize, this is the scanner that will actually get the job done before you lose motivation. If you're looking for scanning tips beyond film, our guide on how to scan pictures covers general best practices.
Pros:
Cons:
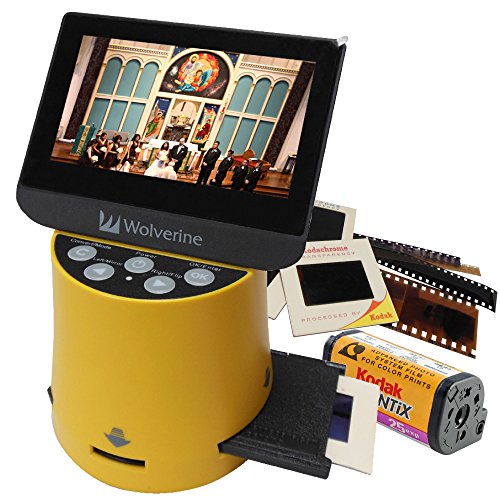
The Wolverine Titan 8-in-1 solves a problem the dedicated film scanners above can't — what do you do when your collection includes 110, 126, 127, and APS film along with standard 35mm? The Titan handles all of them. It's a standalone converter, which means no computer required. Pop in your negatives or slides, preview on the large 4.3-inch color screen, and save directly to an SD card.
The "three seconds" per scan claim is roughly accurate for the basic conversion. Compare that to the multi-minute scans from the dedicated units above, and you can see why standalone converters appeal to people who just want to get the job done quickly. The HDMI output is a nice bonus — connect it to your TV and review your scans on a big screen before deciding which ones to keep. This is especially handy when you're working through hundreds of old slides with family members.
Here's the honest trade-off: scan quality doesn't come close to the dedicated scanners. The sensor resolution is significantly lower, there's no infrared dust removal, and the dynamic range is limited. You won't be making large gallery prints from these scans. But for preserving family memories at a quality that looks great on screens and works perfectly for social media sharing, the Titan gets it done faster and easier than anything else on this list. It's also the most approachable option for people who aren't comfortable with scanning software.
Pros:
Cons:
Kodak's name carries weight in the film world for obvious reasons, and the KODAK Slide N SCAN lives up to the brand's reputation for approachability. The 5-inch LCD display is the largest in this roundup, and it makes a real difference when you're previewing and editing scans. The screen doubles as a digital picture frame when you're not actively scanning — a small touch, but a thoughtful one.
Setup is dead simple. The quick-feeding tray system lets you load film continuously without fiddling with complicated holders. It comes with adapters for 135mm, 110mm, and 126mm film formats, plus a 50mm slide holder. The 22MP sensor captures enough detail for screen viewing and standard-size prints. You can edit basic things like brightness and orientation right on the device, then save to an SD card. No drivers to install, no software to learn.
Like the Wolverine, this is a convenience-first scanner. The 22MP resolution sounds impressive on paper, but it's achieved through interpolation (digitally upscaling a lower-resolution capture) rather than true optical resolution. Colors can lean warm, and there's no infrared dust correction. If you want the easiest possible path from old negatives to digital files and you don't need archival quality, this is the scanner to pick up. The Kodak brand and that big screen make it a popular gift choice for parents and grandparents who want to digitize their photo collections.
Pros:
Cons:
The Magnasonic FS71 rounds out our list as a budget-friendly all-in-one that covers more film formats than most competitors at its price. It handles 35mm, 110, 126, and Super 8 film negatives, plus 135, 126, and 110 slides. That Super 8 support is notable — if you have old home movies on Super 8 film, this is one of the few affordable ways to digitize individual frames from them.
At 24MP, the Magnasonic captures slightly more detail than the Kodak Slide N SCAN, though both are in the same ballpark for real-world quality. The 5-inch display matches the Kodak's screen size, and the interface is similarly straightforward. One standout feature is the 128MB of built-in memory — you can start scanning immediately without an SD card, which is handy if you forget to pick one up. The SD card slot expands storage to 128GB for longer scanning sessions.
Image quality is comparable to other standalone converters in this price range. You're getting digital copies that are perfectly fine for sharing online, making standard prints, or simply having a backup of your analog memories. Don't expect the color fidelity or resolution that the dedicated Plustek or Pacific Image scanners deliver. But at this price point, the Magnasonic does what it promises without any fuss. If you're interested in how these scans look after post-processing, a solid photo editing laptop can help you get the most out of your digitized images.
Pros:
Cons:
Choosing the right negative scanner comes down to understanding what you need from your scans and how much time you're willing to invest in the process. Here's what to consider before you buy. For more guidance on scanning equipment, browse our full buying guide section.
This is the biggest decision you'll make. The two categories serve very different needs:
If you're digitizing a small collection for personal use, a standalone converter will save you time and frustration. If you're archiving irreplaceable negatives or need files for professional use, a dedicated scanner is worth the extra effort.
Resolution is measured in DPI — higher numbers mean more detail. Here's a rough guide to what you actually need:
Dynamic range (measured in Dmax) determines how well the scanner captures detail in very dark and very bright areas of your negatives. A higher Dmax means better shadow and highlight detail. For most color negatives, a dynamic range above 3.6 is excellent. Slide film (which has more contrast) benefits from 4.0 or higher. The Wikipedia article on image scanners provides a solid technical overview if you want to dig deeper into how these specifications work.
Infrared dust and scratch removal (called iSRD, ICE, or Magic Touch depending on the brand) is one of the most valuable features in a film scanner. It uses an infrared light pass to detect physical defects on the film surface, then the software automatically removes them from the final scan. This saves you enormous amounts of time compared to manually cloning out dust spots in Photoshop.
Only the dedicated film scanners in this roundup offer infrared dust removal. If your negatives have been stored in less-than-ideal conditions — and most old negatives have — this feature alone can justify the price premium of a dedicated scanner.
Most dedicated film scanners only support 35mm film. If you have other formats in your collection, check compatibility carefully:
If you need multi-format support, the standalone converters are your only real option without spending significantly more on a flatbed scanner with film adapters.
The software bundled with dedicated scanners can make or break your experience. SilverFast (bundled with Plustek models) is widely considered the gold standard for film scanning software, with features like IT8 color calibration, multi-exposure HDR scanning, and advanced dust removal. Pacific Image bundles its own software that's functional but less refined.
For standalone converters, the "software" is the built-in interface on the device itself. These are intentionally simple — typically just brightness adjustment, rotation, and crop. If you need more editing power, you'll process the files on your computer after scanning.
A dedicated negative scanner is designed specifically for film and slides. It shines a light through the film (transmitted light) rather than bouncing light off a surface (reflected light like a flatbed). This produces significantly better results for film scanning — sharper detail, better color accuracy, and wider dynamic range. Flatbed scanners with transparency adapters can scan film, but they typically produce lower quality results compared to a dedicated film scanner at the same price point.
For most purposes, 3600–4000 dpi is the sweet spot. At this resolution, a 35mm negative produces a file around 20–25 megapixels, which is more than enough for large prints and digital sharing. Scanning at 7200 or 10,000 dpi is mainly useful for archival purposes or when you plan to crop heavily. Keep in mind that higher DPI means larger file sizes (a single 10,000 dpi scan can exceed 500MB) and longer scanning times.
Yes, but results depend on the type and extent of damage. Scanners with infrared dust and scratch removal (like the Plustek models and Pacific Image PrimeFilm series) can automatically fix surface-level defects like dust, light scratches, and fingerprints. Chemical damage, mold, or deep scratches that have affected the emulsion layer are harder to fix and may require manual retouching in photo editing software after scanning. For severely damaged film, consider handling negatives with cotton gloves to prevent further deterioration.
Standalone converters like the Wolverine Titan and Kodak Slide N SCAN produce files suitable for standard-size prints up to about 5x7 or 8x10 inches. The quality is perfectly fine for photo books, small framed prints, and sharing digitally. However, if you want to make enlargements beyond 8x10 or need maximum detail and color accuracy, you'll get noticeably better results from a dedicated film scanner connected to a computer.
Scanning speed varies dramatically by scanner type. Standalone converters can get through a 36-exposure roll in about 5–10 minutes at their default settings. Dedicated film scanners are much slower — expect 2–5 minutes per frame at maximum quality with multi-pass scanning enabled, meaning a full roll could take 1–3 hours. Batch scanners like the Pacific Image PrimeFilm XA Plus speed things up with auto-feeding, but each individual scan still takes time. The key is matching the scanner to your volume — if you have a few dozen rolls, the dedicated scanner's quality is worth the time. If you have hundreds, consider the auto-feed PrimeFilm XA Plus.
For small batches (under 5 rolls), a professional scanning service may be more cost-effective than buying a scanner. Services typically charge $8–$15 per roll for standard quality. However, if you have more than 10–15 rolls, the math quickly favors owning your own scanner. A mid-range dedicated scanner pays for itself after about 20 rolls compared to professional service pricing. Home scanning also gives you full control over crop, exposure, and color correction — plus you can rescan frames that didn't turn out right on the first try.


About James W.
A contributing writer at DigiLabsPro covering photography gear reviews, buying guides, and camera comparisons. Specializes in evaluating cameras, lenses, and accessories for photographers at the intermediate and enthusiast level looking to upgrade their kit.
You can get FREE Gifts. Or latest Free phones here.
Disable Ad block to reveal all the info. Once done, hit a button below
